ACNH Map Designer Guide: Plan an Island Before You Build
A good Animal Crossing map designer workflow does more than place pretty paths. It helps you decide what cannot move, what should move first, and which rivers, cliffs, bridges, inclines, buildings, and daily routes are worth building in Animal Crossing: New Horizons.
Quick Answer: How Should You Use an ACNH Map Designer?
Start by separating fixed constraints from flexible ideas. The airport, Resident Services, river mouths, pier, secret beach, and beach rocks decide the real shape of your island before any theme does.
Then use the planner to test zones, building footprints, path loops, rivers, cliffs, bridges, and inclines. A map that looks impressive but wastes every crossing slot will be hard to finish in-game.
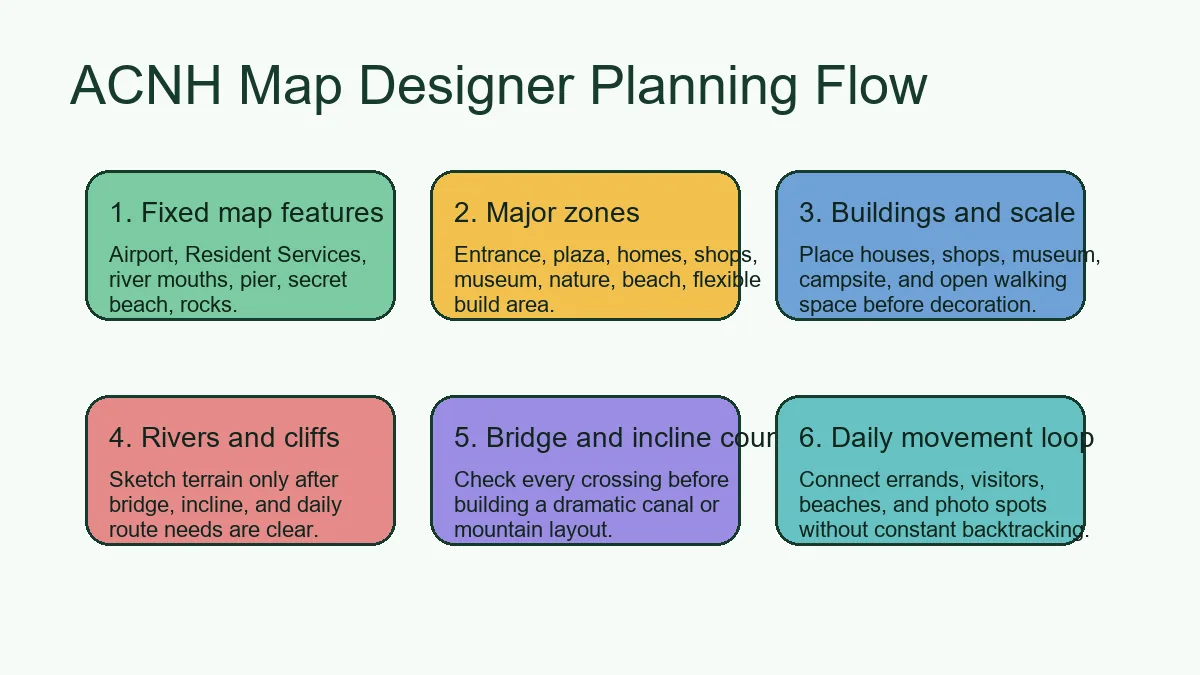
- Airport, Resident Services, river mouths, pier, secret beach, rocks.
- Entrance, plaza, homes, shops, museum, nature, beach, flexible build area.
- Place houses, shops, museum, campsite, and open walking space before decoration.
- Sketch terrain only after bridge, incline, and daily route needs are clear.
How to Plan Your Island Map Step by Step
Start by separating fixed constraints from flexible ideas. The airport, Resident Services, river mouths, pier, secret beach, and beach rocks decide the real shape of your island before any theme does.
Then use the planner to test zones, building footprints, path loops, rivers, cliffs, bridges, and inclines. A map that looks impressive but wastes every crossing slot will be hard to finish in-game.
- Mark fixed features. Airport, Resident Services, river mouths, pier, secret beach, rocks.
- Block zones. Entrance, plaza, homes, shops, museum, nature, beach, flexible build area.
- Place buildings. Place houses, shops, museum, campsite, and open walking space before decoration.
- Draw daily routes. Sketch terrain only after bridge, incline, and daily route needs are clear.
- Sketch water and cliffs. Check every crossing before building a dramatic canal or mountain layout.
- Count crossings. Connect errands, visitors, beaches, and photo spots without constant backtracking.
6 Map Decisions to Make Before Terraforming
Start by separating fixed constraints from flexible ideas. The airport, Resident Services, river mouths, pier, secret beach, and beach rocks decide the real shape of your island before any theme does.
Fixed map features
Airport, Resident Services, river mouths, pier, secret beach, rocks.
- Best for
- Early planning before spending Bells or terraforming time.
- Planner setup
- Airport, Resident Services, river mouths, pier, secret beach, rocks.
- Build note
- Keep this decision visible in your saved planner screenshot.
Major zones
Entrance, plaza, homes, shops, museum, nature, beach, flexible build area.
- Best for
- Early planning before spending Bells or terraforming time.
- Planner setup
- Entrance, plaza, homes, shops, museum, nature, beach, flexible build area.
- Build note
- Keep this decision visible in your saved planner screenshot.
Buildings and scale
Place houses, shops, museum, campsite, and open walking space before decoration.
- Best for
- Early planning before spending Bells or terraforming time.
- Planner setup
- Place houses, shops, museum, campsite, and open walking space before decoration.
- Build note
- Keep this decision visible in your saved planner screenshot.
Rivers and cliffs
Sketch terrain only after bridge, incline, and daily route needs are clear.
- Best for
- Early planning before spending Bells or terraforming time.
- Planner setup
- Sketch terrain only after bridge, incline, and daily route needs are clear.
- Build note
- Keep this decision visible in your saved planner screenshot.
Bridge and incline count
Check every crossing before building a dramatic canal or mountain layout.
- Best for
- Early planning before spending Bells or terraforming time.
- Planner setup
- Check every crossing before building a dramatic canal or mountain layout.
- Build note
- Keep this decision visible in your saved planner screenshot.
Daily movement loop
Connect errands, visitors, beaches, and photo spots without constant backtracking.
- Best for
- Early planning before spending Bells or terraforming time.
- Planner setup
- Connect errands, visitors, beaches, and photo spots without constant backtracking.
- Build note
- Keep this decision visible in your saved planner screenshot.
Map Designer Workflow: From Sketch to In-Game Build
Start by separating fixed constraints from flexible ideas. The airport, Resident Services, river mouths, pier, secret beach, and beach rocks decide the real shape of your island before any theme does.
Then use the planner to test zones, building footprints, path loops, rivers, cliffs, bridges, and inclines. A map that looks impressive but wastes every crossing slot will be hard to finish in-game.
Island Designer guide and planner template help you verify the details before you build.
| Stage | Decide now | Keep flexible |
|---|---|---|
| Map structure | Fixed features, zones, buildings, water, cliffs. | Furniture, flowers, final photo scenes. |
| Movement | Daily loop, crossings, beach exits, secret beach route. | Small shortcuts and decorative paths. |
| Build order | Building moves, bridges, inclines, first terraforming pass. | Final item variants and seasonal changes. |
ACNH Map Designer Checklist
Then use the planner to test zones, building footprints, path loops, rivers, cliffs, bridges, and inclines. A map that looks impressive but wastes every crossing slot will be hard to finish in-game.
Map readiness
- Airport, Resident Services, river mouths, pier, secret beach, rocks.
- Entrance, plaza, homes, shops, museum, nature, beach, flexible build area.
- Place houses, shops, museum, campsite, and open walking space before decoration.
Build readiness
- Sketch terrain only after bridge, incline, and daily route needs are clear.
- Check every crossing before building a dramatic canal or mountain layout.
- Connect errands, visitors, beaches, and photo spots without constant backtracking.
Common Map Planning Mistakes
Start by separating fixed constraints from flexible ideas. The airport, Resident Services, river mouths, pier, secret beach, and beach rocks decide the real shape of your island before any theme does.
- Planning from decoration first. Zones, buildings, crossings, and daily paths should be stable before small furniture choices.
- Ignoring fixed landmarks. A copied map may fail if your airport, river mouths, or Resident Services location differ.
- Using too many isolated pockets. Separate scenic areas are attractive, but each one needs practical access.
- Flattening without a replacement map. A blank island is easier to edit only when the next structure is already planned.
Useful References for Map Planning
Use these references to separate flexible inspiration from real planning constraints.
- ACNH Island Designer & Map Planner Guide - Internal guide for terraforming, limits, fixed features, and route planning.
- ACNH Island Planner Template - Internal worksheet for turning map ideas into decisions.
- Nookipedia: Bridge - Community reference for bridge behavior and constraints.
- Nookipedia: Incline - Community reference for incline behavior and constraints.
ACNH Map Designer FAQ
What is an ACNH map designer?
It is a planning workflow or online map tool for testing island layout decisions before you change terrain in Animal Crossing: New Horizons.
Should I use a map designer before terraforming?
Yes. It helps catch building, path, bridge, incline, river, and cliff problems while changes are still easy.
What should I place first in an Animal Crossing map designer?
Start with fixed features, then major zones, buildings, daily routes, rivers, cliffs, bridges, and inclines.
Can this guide work with the Island Designer App?
Yes. Use the online plan as the low-risk sketch, then use the in-game Island Designer App for final terrain changes.
Does this duplicate the island layout ideas page?
No. This guide focuses on the map planning process; the layout ideas page focuses on finished design patterns and themes.
Turn the Map Plan Into a Buildable Island
Open the planner, test your layout, save a reference, and then build one zone at a time in Animal Crossing: New Horizons.
Open the Free ACNH Island Planner